Phanes Class Heavy Cruisers.
Return to Index page:
Return to
Atlantis Ship Page:
There I was thinking I have nine 9.5" twin turrets removed from the rebuilt
Helios class cruisers. Refurbishing the turrets including dropping the floor
into the barbette to increase the elevation from 28 to 40 degrees. Increasing
the range of the guns from 25,000 yards, to 32,000 yards. Two cruisers with four
turrets each could be built. So lets see what I ended up with.
Until 1935 the Atlantean Admiralty had followed the Treaty strictures on size
limits for vessels. But with the failure of the Treaty's the gloves came off.
Planned and designed for laying down in 1937, the Phanes was to be the be all
and end all of cruiser design. Word had been received of the German Hipper
class, but the Atlanteans knew their ship was better. The other cruisers being
contemplated by the Atlantean Admiralty were almost a 100 foot smaller and 7,000
tons less size. The one thing having the refurbished turrets did for the ships
was to reduce the building time of the ships from four years to just over three
years each. Phanes being laid down in mid 1937 was completed at the end of 1940,
while the Hemera was laid down in early 1938 and completed in early 1941.
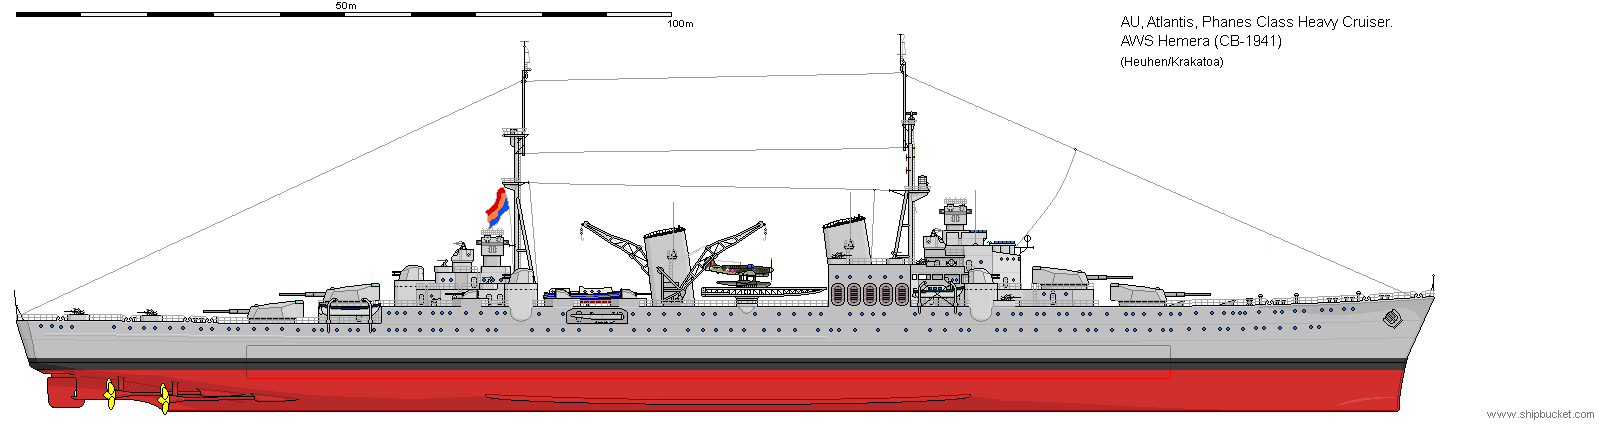
As completed 1941.
Displacement: 17,800 tons normal, 23,450 tons full load.
Dimensions: 709 x 78 x 27 feet
Machinery: 4 shaft, geared turbines, 140,000shp
Speed: 33 knots
Endurance: 12,000 miles at 18 knots
Armour: 6" belt, 3" deck, 6"/4" turrets.
Armament:
8 x 9.5" (4x2)
12 x 100mm (6x2)
20 x 40mm (5x4)
20 x 25mm (10x2)
6 x 21" (2x3) torpedoes
Aircraft: 3
Crew: 1580
Phanes Service Life.
Completed in 1940, after working up the ship had just arrived at Scapa Flow when
the Norwegian campaign started. Grouped with four G class destroyers the group
was ordered to the Trondheim region to intercept any German forces that may be
in the area. The Germans did have a group of ships going to Trondheim, Hipper
and sistership Seydlitz with 4 torpedo boats carrying troops for the occupation
force. The Phanes and destroyers did not hold back even though they were
slightly overmatched. The Phanes took on the lead German cruiser, Seydlitz, and
the destroyers fired at whatever they could see. Phanes shooting was very good
assisted with the new radar ranging for the main guns. The Seydlitz was soon hit
badly, the big 9.5" shells of the Phanes making a mockery of the German ships
armour protection. With three of its main turrets out of action and fires around
the bridge and catapult area the Seydlitz heeled out of the line taking a
torpedo boat with it for help. The Phanes switched fire to the Hipper which
started taking damage and was then rammed by the mortally wounded Glowworm that
had been taking hits from the Hippers 8" guns. One other G class ship had been
badly hit and was struggling to keep up. The German torpedo boats made a torpedo
run against the Phanes and two remaining G class ships trying to force them to
turn away to give the German ships a chance to escape into the dusk and oncoming
night. The German TB's got lucky. One torpedo hit the Phanes, causing enough
damage to force the ships to withdraw. Unknown at the time the Seydlitz had
succumbed to the damage caused by the Phanes, the fires burning out of control
forcing the ship to be abandoned, then minutes later the fires set off the aft
main magazine, the remains of the ship going down by the stern to the sound of
exploding boilers. For the loss of the Glowworm, the Germans had lost Seydlitz,
crippled Hipper (sunk several days later by aircraft from HMS Apollo) and two of
the TB's were also damaged. The loss of the troops housed on the Seydlitz, and
those killed by the damage to the other ships of Group Trondheim meant the
occupation force was open to a counter attack. The Phanes and the damaged G
class ship were ordered to Scottish ports for repair, the remaining two G's
going along as escorts. The Phanes required four months to repair the damage and
it was not till October 1940 that the ship was fit for sea again.
Ordered to New York, Phanes escorted the Queen Mary and Queen Elizabeth to
Australia where they were converted to troopships, taking the Australian and New
Zealand troops to both Port Said for the Western Desert Theatre and then to
Britain for the defence of the UK and eventually D-Day and beyond. The three
ships arrived at Glasgow in mid-1941 after these voyages. The QE and QM
continued their trooping duties but the Phanes was reassigned.
May 1941 and the Phanes was sent to join Admiral Hollands forces guarding the
Straits leading to the North Atlantic. Phanes had only been on station two days
when it was ordered to join Norfolk and Suffolk which had reported four big
ships passing their position. Phanes was a spectator to the battle of Denmark
strait until ordered to give chase to the escaping Prinz Eugen. Chasing the
Prinz Eugen and dueling at long range, both ships were proceeding at best speed
when Prinz Eugen scored a major blow by hitting and destroying the Phanes main
search radar equipment. Unable to keep contact the Phanes had to report the
damage and the escape of the Prinz Eugen, a bitter blow after being already
credited with sinking the Prinz Eugen's sistership Seydlitz.
The Phanes returned to Demeter at Atlantis for repairs, refit, boiler clean and
leave for the crew. Ordered to Gibraltar to join the Pedestal convoy, it joined
the other cruisers in fighting the merchant ships through the Skerki Channel,
withdrawing as cover for the damaged ships.
Secret orders were then received to join Admiral Phillips Force Z. Much
speculation as to what the new force was to be used for was ended when the ships
captain advised the crew that the ships were bound for Singapore. Once at
Singapore and joined with the Atlantean ships which made up the other half of
Force Z. In the ensuing Battle of Malaya, the Phanes was the guardship to the
carriers (see battle description under
Zeus Class battleships) and
spent most of its time firing its AA guns at Jap aircraft.
Phanes continued with Athena from Singapore to Sydney, Australia. After repairs,
refits and cleans, the Force Athena with Phanes as Squadron Command ship went
across to Hawaii. There the Athena met a set of merchant ships filled with
aircraft that had been assembled ready to be craned aboard. The Force
rendezvoused with Admiral Spruance's force to go on to the battle of Midway (see
Athenas War).
The Phanes had managed to live through three of the major battles of the war
with little more than splinter damage. The Phanes returned to Hawaii with the
remaining Atlantean ships. Now to be called Force Phanes, the Phanes had the
Proteus (8x6"), Hesperus and Phaeton (10x5") cruisers, and 4 destroyers. The 4
destroyers were detached and returned to Atlantis to go onto Atlantic Convoy
escort. The four cruisers were transferred to Guadalcanal and Admiral Scott's
cruiser command. Phanes Group with Admiral Schwarzenegger in command fought
several actions in and around Guadalcanal, the Phaeton took damage at
Tassafaronga and went happily off to Sydney for repair. The three cruisers were
reinforced with HMAS Australia and were sent to the Guadalcanal area to attempt
to intercept cruisers that Allied intelligence had predicted would be bombarding
Henderson airfield the night of 12/13 November. Two large and four smaller units
were picked up on radar and fire orders were given to the four cruisers, Phanes
and Australia would take on the cruisers and the two light cruisers would take
the destroyers. Sounds good? The reality was slightly different. 25,000 yards
and Admiral Schwarzenegger ordered open fire and the two heavy cruisers open
fired at their targets. Five minutes later the Japanese ships returned fire, and
to the consternation of the Allied ships, the gun flashes were huge. They were
not cruisers they were actually the Hiei and Kirishima, the shell hits from the
Phanes and Australia were doing superficial damage and the two cruisers were
proceeding into a battle they could not win. Having made their sighting report,
and then the report of the two battleships, Admiral Lee ordered Group Phanes
onto certain headings that would allow his two 16" battleships to be able to
intercept the Japanese pair. The four Japanese destroyers had fired torpedoes at
the Allied cruisers, but the Allied ships were aware of the potency of the
Japanese Long Lance torpedoes and evaded the shoals that came at them. The
Japanese battleships were firing hard and coming on like trains. Australia
caught a couple of hits and was burning amidships, giving the Japanese an aiming
point. It also gave Admiral Lee the final bearing he needed and the battleships
Washington and South Dakota joined the battle shortly thereafter. From looking
like victors the Japanese managed to drag defeat toward them. Receiving the
order "clear fire lines" the Phanes group turned aside and let the big boys slug
it out. Phanes very good Radar ranging kept the Japanese destroyers at bay,
sinking one and damaging another. But even that did not stop the Washington
taking a torpedo hit. The Washington had seriously damaged the Hiei while the
South Dakota had turned the Kirishima into a wreck. Both sets of Admirals then
called for retreat. Admiral Schwarzenegger sent a searchlight signal after the
retreating Japanese forces 'I'll be back', and so the legend began. Admiral
Halsey's carriers sank both Japanese battleships with sustained air attacks the
next day. A resounding victory for the Allies.
Force Phanes escorted HMAS Australia back to Sydney and the group went through
rest and recuperation for the ships and crew. Heading north back to the Solomon
Islands, Force Phanes has the Phaeton back, and is at full strength with four
cruisers. The ships were ordered to join Admiral Walden's TF36 consisting of
three CL's (with 15x6" each) and four destroyers. TF36 had been ordered to
intercept a force of two heavy cruisers and ten destroyers taking reinforcements
to Kolombangara. The Japanese force was split into escorting groups around the
four merchantmen. It was the rear section of three destroyers that the Allies
encountered first. At one in the morning several mini-battles exploded around
the area with the Phanes and one of the US cruisers shooting at the two Japanese
cruisers while the five other Allied cruisers and four destroyers duked it out
with the ten Japanese destroyers. It was at this stage that Admiral
Schwarzenegger made his most famous signal to the Japanese heavy cruisers "I'm
back". Phanes and Helena were shooting well with their ranging radar making a
huge difference (the Japanese did not have this yet). The Helena's fifteen gun
salvos were particularly damaging, while any hit from Phanes big 9.5" shells tore
huge chunks out of the more lightly armoured Mogami class cruisers. After just
20 minute of fire, the Phanes had turned the Suzuya into a burning wreck, while
the Helena had damaged the Kumano, but the cruisers had their revenge, three
torpedo hits on Helena caused fatal damage. Phanes finished off the Kumano while
the other cruisers and destroyers had accounted for two destroyers sunk and two
damaged before they were ordered to retreat. The US destroyers were given one
transport each to sink, which each did. For the loss of the Helena and serious
damage on Phaeton again, the Japanese had lost 2 cruisers, 2 destroyers sunk and
two damaged and the transports full of troops were sunk. Again Force Phanes is
required to send off Phaeton to Sydney for repair. That is the last anyone hears
of the Phaeton as the ship never arrived at Sydney. It was presumed that the
Phaeton was torpedoed and exploded before any report could be made.
Secret orders are then received by Admiral Schwarzeneger detaching the group
from TF36 and ordering them to Hawaii. On arrival at Hawaii the reason for their
recall is apparent. Sitting in the middle of Pearl harbour is an Atlantean Fleet
consisting of the carriers Goliath and Hyperion, the battleships Hephaestus and
Hercules, Phanes sistership Hemera and four other cruisers and a dozen
destroyers. The fleet received the new TF71 number (a second Atlantean Fleet
would arrive later and become TF72) and was ordered to reinforce Admiral Sherman
and his carriers Saratoga and Princeton. Halsey ordered the carriers and TF71,
to steam north through the night of 4–5 November to get within range of Rabaul
for a daybreak raid on the base. Approaching behind the cover of a weather
front, Sherman launched 200 of his available aircraft against the target,
leaving only a few aircraft behind for combat air patrol over his ships. The
aircrews were ordered to damage as many warships as possible, rather than
attempting to achieve a sinking. Aircraft from airfields on Barakoma and the
recently captured Vela Lavella were sent out to sea to rendezvous with the
carrier force to provide it with some measure of protection. The daybreak Navy
air bombing of Rabaul was followed up an hour later with an Army Air Force raid
by 27 B-24 Liberator heavy bombers of the Fifth Air Force, escorted by 58 P-38s.
By the end of the attacks six of the seven Japanese cruisers at Rabaul had been
damaged, four of them heavily. Atago suffered near misses by three 500 lb (230
kg) bombs that caused severe damage and killed 22 crewmen, including her
captain. Maya was hit by one bomb above one of her engine rooms, causing heavy
damage and killing 70 crewmen. Mogami was hit by one 500 lb bomb and set afire,
causing heavy damage and killing 19 crewmen. Takao was hit by two 500 lb bombs,
causing heavy damage and killing 23 crewmen. Chikuma was slightly damaged by
several near-misses. One bomb struck near Agano, which damaged an anti-aircraft
gun and killed one crewman. Three destroyers were also lightly damaged. The
strike had been a stunning success, effectively neutralizing Koga's cruisers as
a threat to the Bougainville mission. Under the threat of additional airstrikes
most of the Japanese warships departed for Truk the next day, practically ending
Japanese naval presence in the area. Losses among the attacking aircraft were
light.
As a minor part of TF71, Phanes got to see most of the major battles of the
Pacific War. Shot at Kamikazes. Shot at bits of sand. Had some great rest,
refit, and recuperation in various ugly little harbours created by the Fleet
Train. One stint at Sydney for the whole Task Force kept Sydney on its toes for
a week. Once the British Pacific Fleet arrived around the South China Seas in
1945, TF71 was assigned to the group to strengthen it and add a set of ships
with experience in theatre. Various strikes were carried out by the Fleets
aircraft around Okinawa and the Shores of Japan through 1945. It was Phanes that
was chosen to appear at Tokyo Bay to witness the Japanese surrender. Phanes that
had spent all of the Pacific War actually in the Pacific. Admiral
Schwarzeneggers
signal? "I'm here'.
Phanes survives the war and as it is only 5-6 years old, a further 20 years of
service might be expected of the ship. While still in service through to 1950, a
major survey of the ship for its suitability for rebuilding to carry the new
missile armaments being contemplated for cruisers, found that the repairs to the
torpedo hit in May 1940 had never been quite right and the ship was slightly
twisted. The end was in sight for Phanes, and after a stint in the Training
fleet the Phanes was sold for scrap in 1954.
Hemera's War Service
Completed in March 1941, the work-up period had just finished, when the ship
received its orders to join Force H. Hardly had the Hemera arrived than it was
off to intercept the Bismarck, the last battleship survivor of the Denmark
Strait action (see Ares class BB).
See Aphrodite's War for
details of the Force H interception of Bismarck with aircraft. Hemera's job was
to watch the aircraft fly off and return, it carried out this duty with
distinction. While tied to the apron strings of Force H, the Hemera did not have
much to do. Not allowed to tackle the big Italian ships, this was undertaken by
Renown and Dionysus. The change in circumstances was the ships transfer to Scapa
Flow and the horror of Russian convoys, in winter. Paired with the British
cruiser Edinburgh as close escort to PQ6, the two cruisers sorted it out that
one would take the even numbered convoys, the other the odd numbered ones. While
each ship was off with its convoy the other would be undertaking the slightly
more harmless duty of covering the exits into the North Atlantic from around
Iceland (Iceland to Greenland, Iceland to Faeroes). Both cruisers built up
escort forces that would be sent with them. PQ7b was Hemera's next convoy with
two destroyers and two trawlers as escort, all nine merchantmen arrived safely.
PQ9/10 where all arrived safely. PQ11 also went undetected by German ships,
U-boats or aircraft and arrived safely at Murmansk. So far Hemera had nothing
worse than the weather to fight.
PQ13 was to be different. The voyage was uneventful until 24 March 1942, when
the convoy was struck by a violent four-day storm, which left the convoy
scattered and in disarray. The ships were dispersed over a distance of 150
miles. Over the next few days the ships coalesced into two groups, of eight and
four, with four others proceeding independently. On 28 March the ships were
sighted by German aircraft, and attacked. Two ships were sunk, Raceland and
Empire Ranger. Also on the 28th a German force of three Narvik class destroyers,
Z24, Z25 and Z26, under the command of KzS G Ponitz, sortied from Kirkenes. They
intercepted Bateau, which was sunk, in the evening of 28/29 March, before
falling in with Trinidad and Fury in the early hours of 29 March. Z26 was badly
damaged by HMS Trinidad, sinking later after a combined counter-attack of Oribi,
Eclipse and the Soviet destroyer Sokrushitelny, but in the course of the action
Trinidad was hit by her own torpedo (the torpedo's gyroscope froze). The
remaining German ships broke off the action as more escorts arrived including
Hemera answering the Trinidad's sighting reports, and Trinidad, escorted by Fury
and Eclipse, limped into Kola Inlet, arriving midday on 30 March. In the
meanwhile the ships of PQ 13 came under U-boat attack. Two ships were found and
sunk by U-boats, Induna by U-376, and Effingham by U-435. Fury attacked an asdic
contact and was credited with the destruction of U-585; however post-war
analysis found that U-585 was lost elsewhere. By 30 March most ships had arrived
at Murmansk; the last stragglers came in on 1 April. 6 ships were lost in this
convoy. The Germans sank five freighters. One whaler, (HMS Sulla), was lost,
probably due to heavy icing, and the cruiser, Trinidad, was damaged. Against
this one German destroyer had been sunk. Fourteen ships had arrived safely, more
than two-thirds of the convoy.
It was during this period that the Hemera lost two of its cruiser running mates,
first Edinburgh then Trinidad succumbed to attacks from German forces. The
battles around the Arctic convoys were heating up. The Germans had finally woken
up to the amount of arms and materiel of war being shipped to Russia. Steps
being taken by the Germans to intercept the convoys stepped up significantly.
PQ15 - The Allies expected PQ15 to be heavily attacked by German forces and the
amount of warships covering the convoy in the distant and close escorts was
large. 11 escorts and destroyers were in the close convoy escort with an AA
ship. The close cruiser escort had a CL and two CA's (including Hemera) with two
destroyers. The distant cover force had a CV, 2 BB, 2 CA, 1 CL and 10
destroyers. A veritable armada to cover the 25 merchantmen. On 3 May at 01:30 in
the half light of the Arctic summer nights, six Heinkel He 111 bombers of I.
Gruppe, Kampfgeschwader 26, the Luftwaffe's new torpedo bomber force, attacked
the convoy, making the first German torpedo bomber attack of World War II. Three
ships were hit. Two were sunk, and one was damaged and later sunk by the German
submarine U-251. Two aircraft were shot down and a third damaged, which
subsequently crashed. A further attack by German high-level bombers at dusk was
unsuccessful. Deteriorating weather on 4 May prevented any further German attacks; an Arctic gale quickly turning into a snowstorm. PQ 15 arrived at the
Kola Inlet at 2100 on 5 May with no further losses. Only a total of four German
aircraft attacks took place, three of which had no affect.
PQ17 was to damage morale of the Royal Navy and put doubt in the belief of the
mental stability of the Admiralty in London. The micromanagement by the
Admiralty of PQ17 showed the damage that can be done by overiding the man on the
spot. The covering forces for PQ17 were similar to PQ15, but the distant cover
force was almost too distant to be of use if the Tirpitz had sortied. Just the
mention of Tirpitz going to sea caused chaos. The distrust between the Royal and
Merchant Navy took a long time to heal.
PQ 17 was the code name for an Allied Second World War convoy in the Arctic
Ocean. In July 1942, the Arctic convoys suffered a significant defeat when
Convoy PQ 17 lost 24 of its 35 merchant ships during a series of heavy enemy
daylight attacks which lasted a week. The German success was possible through
German signals intelligence (SIGINT) and cryptological analysis. On 27 June, the
ships sailed eastbound from Hvalfjord, Iceland for the port of Archangelsk,
Soviet Union. The convoy was located by German forces on 1 July, after which it
was shadowed continuously and attacked. The convoy's progress was being observed
by the British Admiralty. First Sea Lord Admiral Dudley Pound, acting on
information that German surface units, including the German battleship Tirpitz,
were moving to intercept, ordered the covering force away from the convoy and
told the convoy to scatter. However, due to vacillation by the German high
command, the Tirpitz raid never materialised. As the close escort and the
covering cruiser forces withdrew westward to intercept the presumed German
raiders, the individual merchant ships were left without their escorting
destroyers. In their ensuing attempts to reach the appointed Russian ports, the
merchant ships were repeatedly attacked by Luftwaffe aeroplanes and U-boats. Of
the initial 35 ships, only 11 reached their destination, delivering 70,000 short
tons (64,000 t) of cargo. The disastrous outcome of the convoy demonstrated the
difficulty of passing adequate supplies through the Arctic, especially during
the summer period of perpetual daylight.
I hope I have shown the gradual increase of the dangers of the Arctic convoys.
There was no other place that had the perils for such long periods for warships
and merchantmen. If you were not fighting the enemy then you were fighting the
weather. The book HMS Ulysses by Alistair McLean is an exceptional fictional
account of a Russian convoy. If you have not read it yet, check it out of your
local library and do so. It should be mandatory reading for any sea warfare
buff. Henrik may be able to give us some idea of what those poor devils on
Arctic Convoys had to endure, but the rest of us are probably a bit coddled in
our insulated homes.
After PQ17 the Arctic convoys were suspended until September which gave the
Hemera time to be recalled to Atlantis for a full refit period to upgrade the
electronics systems and give the crew a decent period of leave. The Hemera
arrived back in Icelandic waters just in time to join the escort for JW51B. The
short synopsis of the Battle of the Barents Sea is: The Battle of the Barents
Sea was a naval engagement on 31 December 1942 between warships of Nazi
Germany's Kriegsmarine and British ships escorting convoy JW51B to Kola Inlet
in the USSR. The action took place in the Barents Sea north of North Cape,
Norway. The German raiders' failure to inflict any significant losses on the
convoy infuriated Hitler, who ordered that German naval strategy would focus on
the U-boat fleet rather than surface ships.
In addition to the convoy escort, the cruisers HMS Sheffield HMS Jamaica, AWS
Hemera and two destroyers were independently stationed in the Barents Sea to
provide distant cover. These ships, known as "Force R", were under the command
of Rear-Admiral Robert L. Burnett, in Sheffield. The German forces included the
heavy cruiser Admiral Hipper; heavy cruiser (often termed a pocket battleship)
Lützow; light cruiser Magdeburg; and destroyers Friedrich Eckoldt, Richard
Beitzen, Theodor Riedel, Z29, Z30 and Z31. These ships were based at Altafjord
in northern Norway, and were under the overall command of Vice-Admiral Oskar
Kummetz, in Hipper.
The encounter took place in the middle of the months-long polar night and both
the German and British forces were scattered and unsure of the positions of the
rest of their own forces, much less the enemy's. Thus the entire battle became a
rather confused affair. During the battle it was not clear who was firing on
whom or even how many ships were engaged. This is where the new electronic
outfit fitted to Hemera in its refit came into its own. Hemera had been able to
track its own forces ships and was able to tell them where they were in relation
to each other and which way the enemy was. The Germans had split their forces
into 3 groups, with one cruiser and two destroyers in each, trying to split the
Convoy Escort to allow one or more of the groups an unhindered run at the
convoy. These were good tactics and almost worked. It was the weather that
played the biggest part in saving the convoy. The weather stopped the Germans
from being able to co-ordinate their attacks with the precision expected of
them.
The first phase of the battle had the Hipper approaching from the south of the
convoy. The ships were picked up on the escorts radar and Captain Sherbrooke
concentrated his destroyers and went out to chase off the Germans. He did leave
two destroyers and the other smaller escorts with the convoy. Sherbrooke was
injured in the following action with Hipper and command of the escort then fell
to the Commander of HMS Obedient. This is where the Germans were hamstringed,
they were to attack the convoy without risk of losing any of the big cruisers.
So a feint torpedo attack was enough to get the Hipper to turn away. While
Sherbrooke was away with the Hipper. Phase two had the Lutzow Group hove into
sight of the convoy and sink the minesweeper Bramble and the destroyer Achates.
The Achates had managed to get the Lutzow also to turn away by actually firing
torpedoes at it. The convoy was wide open. The Magdeburg Group was coming in
from a northerly bearing thinking their Christmases were all coming at once.
Magdeburg Group was blindsided by Force R, the cat pounced on the helpless mice.
Firing orders were passed by Admiral Burnett, the two 6" cruisers would take a
destroyer each while the Hemera got the cruiser to play with. At this stage of
the war the flashless powder of the guns gave an eerie feeling with the guns
firing. Burnett's flagship Sheffield quickly sank its destroyer opponent without
receiving damage itself. Jamaica badly damaged its opponent before it managed to
escape into the distance. Hemera also made short work of the Magdeburg. Taken by
surprise the Magdeburg was unable to use its best advantage - speed. The big
9.5" shells of the Hemara tore big holes out of the Magdeburg and after only a
few hits in the centre of the ship, the Magdeburg was crippled with no power.
Jamaica at the rear of the line closed and fired one bank of three torpedoes
which hit along the length of the Magdeburg which rolled over and sank. First
blood to Force R. The Magdeburg Group had signalled the arrival of the three
cruisers of Force R, but the Hipper was on a return leg to the convoy, after the
main destroyer force of the escort had been called away to chase off the Lutzow
on the other side of the convoy. Admiral Burnett and Force R was on its way to
deal with the sighting of the Hipper when the Lutzow also came back into sight
of the escorts on that side of the convoy. Admiral Burnett detached the Hemera
to deal with Lutzow while he took the other two cruisers to go after the Hipper.
This was what the Hemera and Phanes had been built for, running down and killing
cruisers. Lutzow may have had 11" guns but its armour was no better than any
other Treaty cruiser. Lutzow though was slow, only 27/28 knots compared to
Hemera's 33 knots. Once the Hemera got the Lutzow in sight only a lucky hit from
Lutzow could have saved it. Lutzow was unlucky. Over the next 30 minutes the Hemera got closer to the Lutzow and inflicted damage then more damage, then
fatal damage. Lutzow had done well and hit the Hemera with five of the big 11"
shells but had hit non-critical areas where the resulting damage could be
controlled. Lutzow's speed bled away as the damage to the diesel engines slowed
the ship. The destroyer Obedient closed the Lutzow and administered the
coup-de-grace hitting with three out of a four spread of torpedoes. The Lutzow
went down. The Hipper having heard of the losses of the Magdeburg Group and
Lutzow, turned and ran before Admiral Burnett could catch up.
Aftermath of JW51B.
Despite this German attack on convoy JW 51B, all 14 of its merchant ships
reached their destinations in the USSR undamaged.
Even more critically for the outcome of the war, Adolf Hitler was infuriated at
what he perceived as the uselessness of the surface raiders, seeing that three
cruisers were driven off by mere destroyers, and losing two of the cruisers to
boot (the Allied cruisers were conveniently forgotten). There were serious
consequences: this failure nearly made Hitler enforce a decision to scrap the
surface fleet and order the German Navy to concentrate on U-boat warfare.
Admiral Erich Raeder, supreme commander of the Kriegsmarine, offered his
resignation—which Hitler accepted, apparently reluctantly. Raeder was replaced
by Admiral Karl Dönitz, the commander of the U-boat fleet, who saved the German
surface fleet from scrapping; though Hipper and two (Emden and Leipzig) of the
light cruisers were laid up until late 1944, and repairs and rebuilding of the
battlecruiser Gneisenau were abandoned and just as importantly the completion of
the Graf Zeppelin was again delayed. E-boats continued to operate off the coast
of France, but the only major surface operation executed after the battle was
the attempted raid on Convoy JW55B by the battleship Scharnhorst, which was
sunk by an escorting British task force in what later became known as the Battle
of the North Cape.
This was the end of Hemera's participation with the Arctic convoys. It was
withdrawn back to Demeter for the repairs to the damage caused by Lutzow's shells
and went on to join the Atlantean Fleet that arrived at Hawaii to be joined by
Force Phanes, to become TF71 whose service are noted above in Phanes war service
record.
Post war and the Hemera was Flagship of the 1st Cruiser Squadron which spent its
time tied to the carriers and battleship of Fleet One. 1950 and like the Phanes
the Hemera is surveyed for future employment. Unlike the Phanes, the Hemera
received the big tick for rebuilding with the new missile armaments coming into
fashion.
The next three drawings were my attempts to get right a
missile conversion of the Hemera.

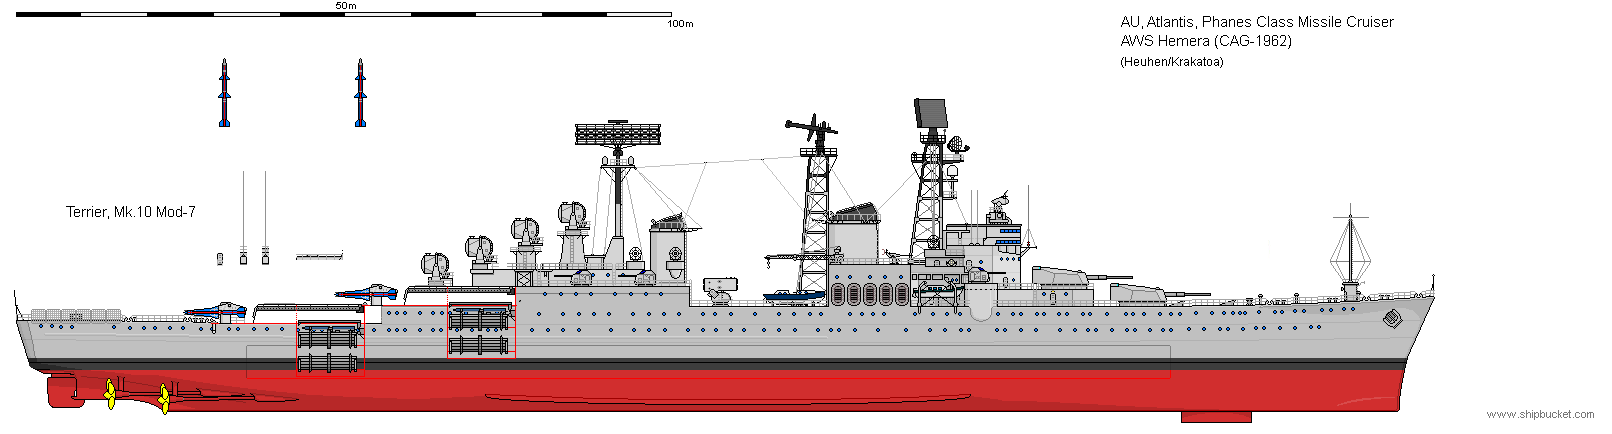

This was the final 'complete' version with everything in place.
Return to
Atlantis Ship Page: