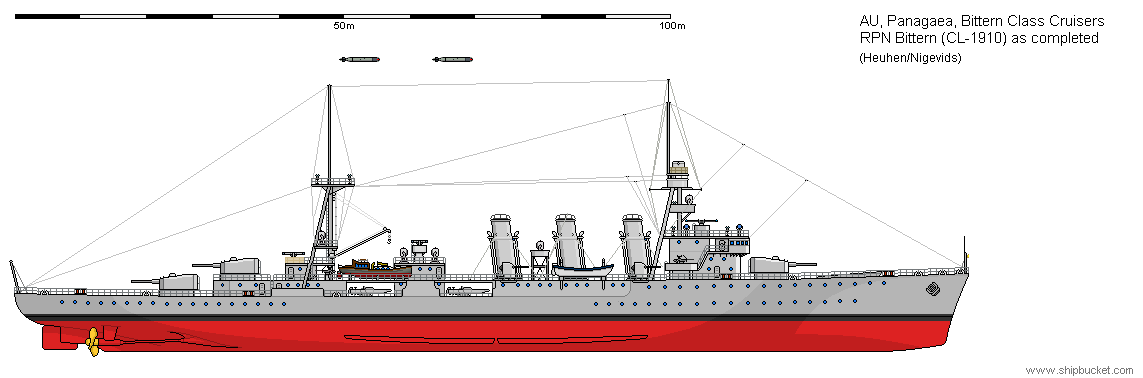
The Bittern class followed the Cataphract layout with the main armament reduced to three twin 6" turrets. They were slightly larger and faster than the Royal Navies 'Town' class ships being built at the same time. The 'Town' class broadside cruisers only had four 6" open mounted guns on each side. Mounting the 6" in turrets actually gave a better broadside for less guns. A marked advantage. While the turret gave its crew some protection.
The Bittern and Skua joined the Skirmisher and other cruisers chasing Admiral von Spee's cruiser Squadron all over the Pacific. The Skua had the honour of catching the Dresden at Juan Fernandez Island and sinking it. The pair were reunited in the 2nd Light Cruiser Squadron under Commodore Goodenough, participating in the Dogger Bank and Jutland battles in 1915-16. With HMS Glorious the ships participated in the Second Battle of Heligoland Bight in November 1917 and were present when the German High Seas Fleet surrendered a year later. Like all navies, the Panagaean Navy never had enough cruisers and these ships were kept in service where other navies may have already discarded the ships. The changes between the wars were to swap out the 18" torpedoes for 21" mountings, change the 4" from low angle to dual purpose mountings , and change the old 2 pounder guns to AA weapons, adding a quadruple mount on the center superstructure. The 4" director was replaced with a dual purpose one while the directors received upgrades as well.
.PNG)
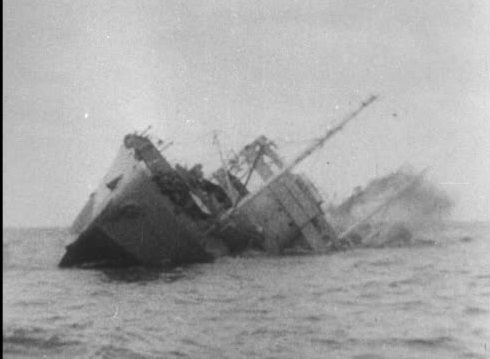
1939 and early 1940 the two ships were on Pacific and Indian Ocean patrols, searching for German warships or merchantmen that were at sea at the outbreak of war. Bittern caught a German Merchantmen which scuttled itself rather than being captured, deny your enemy any advantage. 1940-41 the German Navy has sent out its armed merchant raiders onto the oceans. Bittern and Skua are on the trade routes searching for these ships. November 1941 and Bittern is with HMAS Sydney when the Sydney comes up with a merchantmen which turns out to be the Kormoran, a German raider. The Sydney gets too close to the Kormoran which reveals itself as a raider by dropping the concealment of its guns and opening fire. A torpedo is fired by the Kormoran which hits the Sydney. The Bittern was twenty miles away and coming to the aid of the Sydney. The Bittern comes in range of the Kormoran and opens fire, while the Sydney disengages with large fires and a list from the torpedo hit. Bitterns first job is to put down the Kormoran. The range continues to drop and the Bittern is now hitting the Kormoran regularly. Gouts of flame erupt from the Kormoran as the machinery rooms take hits and the ship slows to be dead in the water. The Bittern goes by at full speed and launches a bank of torpedoes at the Kormoran, two hits and the Kormoran is finished. Launching boats as the ship heels over and will eventually capsize and sink. The Bittern is now looking to go to the aid of the Sydney which was last seen heading south-east with large fires and covered in smoke. The Bittern goes down the smoke trail but can not locate the Sydney. It does not appear on radar either. The Sydney has also capsized from the torpedo hit it received and sunk. In real life there are no survivors from the Sydney, with the Bittern in the area some survivors would be found before the sharks got them.
Both Bittern and Skua are at Perth, Australis when the Japanese attack Pearl Harbour. They have been on the trade routes between Australis and the Red Sea, and South Africa. Sharing these duties with Australis cruisers. Which is how Bittern and Sydney had combined to sink the Kormoran. Both Bittern and Skua are sent north, Skua to Singapore, Bittern to Darwin. Skua goes north with Force Z, only to return after the horror of watching Force Z getting decimated by far superior air power. Skua received some bomb damage during the battle and is sent to Trincomalee for repairs. Bittern goes north again to Java to join the ABDA forces. Bittern receives two torpedo hits and is sunk during the Battle of the Java Sea. Skua is repaired and joins the Cornwall and Devonshire heading south from Ceylon as escorts to the Hermes. This is April 1942 and the Japanese strike Fleet of Admiral Nagumo and their six carriers storm through the Straits from Singapore out into the Indian Ocean to clear the Indian Ocean of any Allied warships. Scouts from the Japanese carriers sight the four ships and a strike force is ranged on the carriers and sent off to sink the Allied ships, which they easily do. The four ships are overwhelmed, the six Griffons on board Hermes are just slaughtered and dive bomber and torpedo bombers combine to sink the four ships with bomb and torpedo hits. A text book exercise for the Japanese.
These two cruisers have provided thirty years of excellent service. They were built in a time when first class parts were put together with no rush to turn out excellent light cruisers.